

Where To Buy Extra Cork Pieces For Sandal Repair
How to Install Cork Tile Flooring
Updated: Sep. 30, 2022
Easy-to-cut cork tiles and a bootleg cutting jig make this a hassle-free DIY project.

We'll show you everything you need to install a cork floor. Cork flooring is a natural, renewable product that's piece of cake to install yourself with basic tools. It'due south also attractive, quiet underfoot and easy to clean. It'southward a great choice for living rooms, offices and fifty-fifty the kitchen.
You might also similar: TBD
- Fourth dimension
- Complexity
- Cost
- Multiple Days
- Advanced
- $501-1000
Stride 1: Programme your new cork floor
What is cork floor? Largely popular decades ago, natural cork is speedily regaining its lost turf as a major flooring selection. Why? Cork tiles are a natural, renewable production; warm, comfortable and quiet underfoot; and merely obviously beautiful. Best of all, with basic tools, some patience and persistence, yous can enjoy the benefits of a natural cork flooring in a weekend.
In the demonstration photos, we show yous how to install natural 12-in. unfinished cork tile over a sound plywood underlayment. This is just ane of a wide multifariousness of cork flooring products that are available. Meet "Cork Has Many Faces" beneath.
Plan your design on graph paper
Measure your room and describe information technology to scale on graph paper. As you lay out your blueprint, avoid thin cuts of tile nearly walls by shifting the layout to one side or the other. Draw your border or pattern besides and add up all the tile. Purchase several extra tiles of each color simply in case y'all make some cutting errors (you lot tin always cutting the extras into coasters).
Note: Our decorative border started well-nigh 8-1/2 in. from each side wall and was 11-ane/2 in. wide (close to a full-size tile) including the 2-in. special-lodge dark cork strips. Avoid placing a border besides close to the wall.
Cork Floor Has Many Faces
Cork is 1 of nature'southward wonders. This astonishing, renewable wood product is harvested from the bark of certain oak trees grown mostly in Portugal. The thick outer layer of bark is advisedly harvested, leaving the underlayer to regenerate for harvest about nine years later on. This process continues until the tree is well-nigh 150 years erstwhile, and so a new tree replaces the former.
Cork flooring is made from cork fragments bonded together and cut to a multifariousness of sizes, thicknesses and shapes. Our floor was natural unfinished cork, but you tin buy prefinished cork with a urethane top coating, vinyl-clad cork with a tough vinyl coating on top and bottom, or floating cork floors that either glue or click together and float over a sparse cork underlayment.
Stride 2: Cork floor for basement: Prep the old flooring

Photo 1: Fill and sand the subfloor
Fill the seams and depressions with a Portland cement–based floor leveler. Feather the filler perfectly smooth with the underlayment. Once it's dry, scrape whatsoever ridges and sand abroad any high spots with a pole sander (Photo 9) fitted with 100-grit sandpaper. Check also for loftier screws every bit you elevate your blade across the flooring. If you hear a click, set the screw lower. Call up, irregularities or high fasteners volition 'telegraph' upwards through the cork.
An installation is only equally adept equally the surface below. Natural cork squares must exist glued to a flat, polish surface. Yous tin can't install them directly over plank flooring, vinyl or linoleum. You lot'll demand to spiral a plywood underlayment at least 1/4 in. thick over your existing flooring.
Although it's non the installation that nosotros show, cork can be glued to a flat, smoothen and moisture-gratuitous concrete floor. Cheque with your flooring supplier for special tips on installing cork over concrete.
If you lot already take a few layers of floor in the room of choice, tear out the quondam layers and install new underlayment on the subfloor.
Cut your underlayment plywood and screw it to your subfloor or existing floor. Don't substitute particleboard or hardboard for plywood. It must be at least i/4 in. thick and stamped and graded as underlayment plywood.
Make certain your screws are prepare flush with or simply below the plywood underlayment surface. Stagger the joints of your plywood (at to the lowest degree 32 in.) and leave a gap 1/16 to 1/8 in. between sheets. Screw the seams every four in. and every half dozen in. elsewhere.
CAUTION!
If you lot have an old flooring glued downwards before 1980, there may exist asbestos in the tile or agglutinative. This mineral can be hazardous if it becomes airborne, and so call your local health department to learn procedures for removal and disposal.
Pace three: Snap layout lines and spread adhesive

Photo 2: Snap layout lines
Snap your layout lines in one case you've adamant the center of the room. Our room has a perimeter edge, so we decided to outset half a tile from the heart to make the layout piece of work. Draw your layout on graph newspaper to determine where to snap your layout lines.
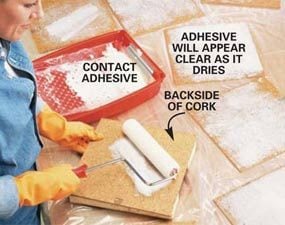
Photograph 3: Mucilage down cork flooring: Spread adhesive on the tile
Scroll contact adhesive on the backs of the cork tile the dark before yous start. This will save time when yous're fix to lay the floor. The adhesive will remain active for 12 hours even though it feels dry out. Y'all tin can stack them once the adhesive is dry, but don't permit the glued surfaces touch.
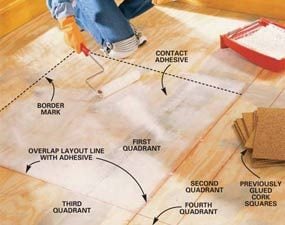
Photo 4: Spread adhesive on the floor
Whorl enough adhesive to lay the cork in the first quadrant. Let the agglutinative dry to the touch (most 30 minutes or more). Lay the squares beginning at the center, so work your way out, butting the tiles tightly.
Spread the contact adhesive ahead of time
Figure out how many cork tiles you have time to lay and whorl the agglutinative onto their backsides the night before (Photo three). This will make the task become a lot smoother the adjacent morning. We easily laid the tile for our 10 ten 10-ft. room in one day, only if yous're a first timer, allow some other day. Y'all can cut preglued tiles when they're dry to the bear on, but if yous have a lot of cutting to do (like we had for our border), then cutting the pieces first and so curlicue the cement onto the backsides.
For an open rectangular room similar ours, it works best to split it into quadrants. Snap your lines (Photograph 2) and then spread the adhesive for your first quadrant. Overlap the adhesive an inch or more across the quadrant so you lot don't have to meticulously whorl the adhesive near the laid tile while preparing the next quadrant.
Even though the vapors from the agglutinative are no more than harmful than latex paint vapors, crank some windows open to get good ventilation as you lot apply it. Apply a low-nap roller that won't shed fibers (stay abroad from cheap rollers). When y'all've finished rolling 1 section, wrap your roller and tray in a plastic pocketbook to keep information technology wet until yous're ready to tackle the next section.
Adhesives
In that location are basically two types of agglutinative used to install cork flooring: contact cement and mastic. We used a waterborne contact adhesive, not because it was better but because the tiles were not likely to shift in one case they were laid. The contact agglutinative is rolled onto each surface, allowed to dry to the touch, and then these glued surfaces can be mated. In one case the tile is down, you can't motion it.
The mastic agglutinative (Photo) is a one-step, trowel-on agglutinative that you trowel onto the underlayment but. Information technology's more forgiving because you can move a misplaced tile, but the downside is the tile can shift if you bump it before the agglutinative is gear up, destroying all your conscientious work. Manufacturers will warranty their cork only if it's installed with their suggested agglutinative, so if a
warranty is of import to you, find the distributor
with the method y'all like all-time and follow its suggestions.
Step four: Lay the cork tiles

Photo 5: Set the tiles
Spread adhesive into the second quadrant and permit information technology dry for at least 30 minutes. Butt one tile into the side by side and then carefully push it into the agglutinative. Once the tile'south down, you lot won't exist able to budge it. Tap each tile with a rubber mallet to farther mate the surfaces.

Photo 6: Curlicue the cork
Roll the cork down with a rental floor roller. This pace is a must to ensure the squares are completely bonded to the underlayment.
If this is your get-go fourth dimension working with contact adhesive, yous're about to find out how strong it is. Once you printing a tile downwards, y'all won't be able to movement it. Be careful and follow your layout lines precisely. You'll find that once yous get a few tiles pressed into place, the next tiles volition be easier to position because you tin can butt them against existing tiles and drib them into position.
Tap the tiles with a rubber mallet equally you lot lay them and so roll the completed flooring with a heavy floor roller (hire) to bond the agglutinative uniformly.
Note: If you practice stick a cork tile in the wrong spot, use a house-blade, 3-in. scraper to pry and scrape it upwardly. Employ new adhesive to the spot, permit information technology dry and try it again.
Step 5: Cutting tiles with a elementary jig
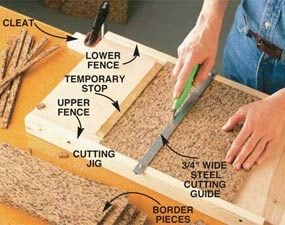
Photo vii: Brand clean straight cuts
Cut each square accurately with a homemade jig. The contend should exist about 1/xvi in. higher than the tile. Use a framing square to position the steel cutting guide (steel stock purchased at hardware shop) square to the fence. Blast a stop to the base of operations of the jig to brand exact repeatable cuts.

Photo viii: Set the cut tiles
Lay the border tile around the field tile. Be sure to sketch this border on graph paper in accelerate to adjust the pattern and then all corners are identical. You may need to trim the border pieces virtually the center surface area for your pattern to be consequent.
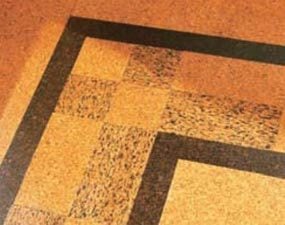
Shut-upwards of border
Use graph paper and your own creativity to blueprint the border corner.
Build this simple jig to cutting your cork. I've tried several methods for cutting tile only found a elementary bootleg jig like this works best (Photo 7). Cut a 3/iv-in. plywood base jig just slightly taller (ane/xvi in.) than your cork tile. Screw a iii/4-in. x 2-in. argue to each side, leaving the argue but slightly college than the thickness of the cork. Spiral some other strip under the back side of the base as a cleat and then clench this piece to your workbench so the jig is rock solid. Next, align your steel cut guide foursquare to the fences with a framing foursquare, drill a pigsty at each end and screw it into place.
To use the jig, align the cork tile with your mark and agree your utility knife straight upward and down and pull the knife across the tile several times until information technology cuts through. A light bear on is best. The fences keep the tile from shifting as you cut, guaranteeing a nice, square cut.
The jig works particularly well for repeated cuts, like those in the border. Only measure out the width y'all want (like 3-3/four in. for our inner border widths), smash a stop in identify, push the tile confronting it and cut.
Step 6: Sand and terminate the cork

Photo 9: Sand off loftier spots
Sand whatsoever small high spots or ridges with a drywall sander using 100-dust sandpaper followed by 150-grit sandpaper. Vacuum the entire floor twice.
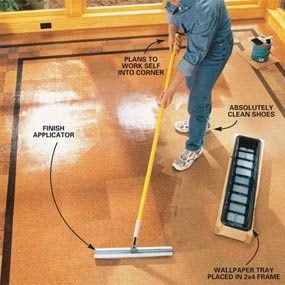
Photo 10: Apply the finish
Spread your commencement coat of waterborne polyurethane using a wide applicator available at your flooring supply store or dwelling center. Castor in the corner and edges first with a iv-in. paint brush. Keep a wet edge and avoid puddling the finish. Pull the applicator over the moisture expanse very lightly to smooth the finish. Expect two to three hours and utilize another coat. Two total-forcefulness coats will be acceptable. Permit the end cure for several days earlier you bring in the piece of furniture and heavy traffic.
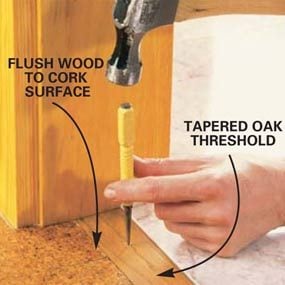
Photo 11: Make thresholds
Custom-cutting your own threshold to fit transitions.

Photo 12: Nail up base shoe
Blast the base shoe over the trimmed outer edge of the floor into the wall.
Traditionally, this type of flooring was finished with a paste wax and so buffed to a sheen. You can still do this and you lot'll be pleased with the results. Today's modern urethanes, all the same, will give y'all greater protection against moisture and dirt.
I tested waterborne and oil-based polyurethanes and found that both added depth and beauty to the cork. The ease of applying the waterborne finish and the lack of noxious fumes get in a clear choice. You tin employ two to three coats hands in one day.
Required Tools for this Projection
Have the necessary tools for this DIY project lined up before you beginning—you'll save fourth dimension and frustration.
You'll too demand a flooring roller and a finish applicator.
Required Materials for this Project
Avert concluding-minute shopping trips past having all your materials ready ahead of time. Here's a list.
Originally Published: September 30, 2022

Where To Buy Extra Cork Pieces For Sandal Repair,
Source: https://www.familyhandyman.com/project/how-to-install-cork-tile-flooring/
Posted by: shumwayarlither1978.blogspot.com
0 Response to "Where To Buy Extra Cork Pieces For Sandal Repair"
Post a Comment